FritzBox Presence Detection Using Home Assistant
Set up your Raspberry Pi
Install Raspberry Pi OS
First we need to install the Raspberry Pi OS. This is an operating system designed for the raspberry pi. It is based on the Linux Distribution Debian. This is installable in multiple variants. We will choose Raspberry Pi OS Lite because it needs less storage than the full version. The tradeoff here is that Raspberry Pi OS Light does not come with desktop support, in other words, it is only possible to control the device via your keyboard and not with your mouse.
Task
Install Raspberry Pi OS Lite on your SD-Card and start you Raspberry Pi.
While installing make sure to set up Wi-Fi, SSH and a password.
Solution
- Go to https://www.raspberrypi.com/software/ and install the Raspberry Pi Imager
- Open the Raspberry Pi Imager
- For OS choose Raspberry Pi OS (other) > Raspberry Pi OS Lite (32-bit)
- Insert the SD-Card into your PC and select your SD-Card
- Go to advanced options
- Activate SSH
- Set a password (and different username if you want)
- Configure your Wi-Fi and Wi-Fi country
- Click on write
- Remove your SD-Card from you PC and insert it into your Raspberry Pi
- Turn on your Raspberry Pi by giving it power using the cable
First login to the raspberry pi
Download putty and login to your raspberry pi via SSH.
ssh pi@raspberrypi.local
(Replace pi with your username if you changed it while installing)
Install all updates
Update your repositories
sudo apt update
Upgrade your software
sudo apt upgrade
If there are any updates, you will be asked to accept the updates.
Install Docker
First watch this short video about what Docker is.
Follow this guide https://docs.docker.com/engine/install/debian/ to install docker on your Raspberry Pi.
Pitfall "Job for docker.service failed because the control process exited with error code."
Job for docker.service failed because the control process exited with error code.
See "systemctl status docker.service" and "journalctl -xe" for details.
invoke-rc.d: initscript docker, action "start" failed.
● docker.service - Docker Application Container Engine
     Loaded: loaded (/lib/systemd/system/docker.service; enabled; vendor preset: enabled)
     Active: activating (auto-restart) (Result: exit-code) since Thu 2022-12-22 16:37:08 GMT; 21ms ago
TriggeredBy: ● docker.socket
       Docs: https://docs.docker.com
    Process: 12532 ExecStart=/usr/bin/dockerd -H fd:// --containerd=/run/containerd/containerd.sock (code=exited, status=1/FAILURE)
   Main PID: 12532 (code=exited, status=1/FAILURE)
        CPU: 357ms
dpkg: error processing package docker-ce (--configure):
 installed docker-ce package post-installation script subprocess returned error exit status 1
Errors were encountered while processing:
 docker-ce
E: Sub-process /usr/bin/dpkg returned an error code (1)
Just try rebooting the raspberry pi with
sudo reboot
Pitfall "Got permission denied"
docker: Got permission denied while trying to connect to the Docker daemon socket at unix:///var/run/docker.sock: Post "http://%2Fvar%2Frun%2Fdocker.sock/v1.24/containers/create": dial unix /var/run/docker.sock: connect: permission denied.
See 'docker run --help'.
Don’t forget to also continue with the Linux post-install steps which are mentioned on the end of “Install docker engine”, see https://docs.docker.com/engine/install/linux-postinstall/
Validate everything works via
docker run hello-world
The output should look like this:
Unable to find image 'hello-world:latest' locally
latest: Pulling from library/hello-world
9b157615502d: Pull complete
Digest: sha256:c77be1d3a47d0caf71a82dd893ee61ce01f32fc758031a6ec4cf1389248bb833
Status: Downloaded newer image for hello-world:latest

Hello from Docker!
This message shows that your installation appears to be working correctly.

To generate this message, Docker took the following steps:
 1. The Docker client contacted the Docker daemon.
 2. The Docker daemon pulled the "hello-world" image from the Docker Hub.
    (arm32v7)
 3. The Docker daemon created a new container from that image which runs the
    executable that produces the output you are currently reading.
 4. The Docker daemon streamed that output to the Docker client, which sent it
    to your terminal.

To try something more ambitious, you can run an Ubuntu container with:
 $ docker run -it ubuntu bash

Share images, automate workflows, and more with a free Docker ID:
 https://hub.docker.com/

For more examples and ideas, visit:
 https://docs.docker.com/get-started/
Install Home Assistant
Home Assistant provides an installation manual for docker itself (https://www.home-assistant.io/installation/raspberrypi#install-home-assistant-container). We will follow this in a slightly changed form.
Docker Run
First let’s try to start a home assistant docker container by hand, just run:
docker run -d \
  --rm \
  --name homeassistant \
  -e TZ=Europe/Berlin \
  -v ~/data/homeassistant/:/config \
  ghcr.io/home-assistant/home-assistant:stable
This can take a while depending on your internet connection.
Task
Try to find out what all those parameters do
Solution
| Parameter | Function |
|---|---|
| -d | Starts the container detached (in the background) |
| –rm | Automatically removes the container when its stopped |
| –name | Gives the container a name with which it can be referenced later |
| -e | Specifies environment variables inside the container |
| -v | Mounts a volume from your local filesystem to the container’s filesystem Here this means that the local folder data/homeassistant/ will be accessible inside the container via /config. This has 2 advantages: 1. If the container is gone the files in /config will still be accessible. 2. We can edit the files inside the container by just editing it in datat/homeassistant. |
When it’s started you should first of all see that there are some file being created in data/homeassistant. You can check this by running:
ls data/homeassistant
This list all files in the directory data/homeassistant.
Additionally, we can also have a look at the logs of the Home Assistant container. Do this by running
docker logs homeassistant
This should look somehow like this:
s6-rc: info: service s6rc-oneshot-runner: starting
s6-rc: info: service s6rc-oneshot-runner successfully started
s6-rc: info: service fix-attrs: starting
s6-rc: info: service fix-attrs successfully started
s6-rc: info: service legacy-cont-init: starting
s6-rc: info: service legacy-cont-init successfully started
s6-rc: info: service legacy-services: starting
services-up: info: copying legacy longrun home-assistant (no readiness notification)
s6-rc: info: service legacy-services successfully started
Normally Home Assistant exposes port 8123 and should therefore be accessible via http://raspberrypi.local:8123 in your browser.
Currently, this is not possible.
The problem is that although the container has opened it 8123 port this is not automatically mapped to the port of the host system (here: Raspberry Pi)
Task
First stop the container via the following command.
docker stop homeassistant
Then try to modify the docker run command so that it also publishes the port 8123 to the raspberry pi port 8123.
Hint
This feature can be found via the parameter -p. Look it up and configure it accordingly.
Solution
docker run -d \
  --rm \
  --name homeassistant \
  -e TZ=Europe/Berlin \
  -v ~/data/homeassistant/:/config \
  -p 8123:8123 \
  homeassistant/home-assistant:stable
Now you can open http://raspberrypi.local:8123 and Home Assistant should be visible.
Docker Compose
Before we start to set up the Home Assistant we now don’t want to type the long command each time we want to stop or start homeassistant.
We can define our container properties via a so called docker-compose file.
Inside it, we can define everything we would otherwise do via command line parameters.
First start by stopping the old container using
docker stop homeassistant
Start the compose-approach by creating a docker-compose.yml.
You can do this using your favourite text editor, otherwise just use nano like this:
nano docker-compose.yml
Paste the following content into this file. Be careful, yaml is sensitive to indentations, so the formatting should be like this.
version: '3'
services:
  homeassistant:
    image: "homeassistant/home-assistant:stable"
    volumes:
      - ~/data/homeassistant:/config
      - /etc/localtime:/etc/localtime:ro
    restart: unless-stopped
Notice we now have two more configuration options than with the docker run.
- A volume mapping
/etc/localtime:/etc/localtime:ro. This maps the local time of the raspberry pi to the local time of the Home Assistant container. Additionally, notice the:rothis stands for read only, because we don’t want home assistant to modify our time. restart: unless-stopped: This will restart - as the name as - the container unless it is stopped manually. Also if you reboot your raspberry pi this will start the container when the docker daemon is running again.
You can now start this compose file by running
docker compose up -d
You can stop this container using
docker compose down
We have the same problem as before, the port is not accessible on the raspberry pi.
Task
Modify the docker-compose.yml so that it also publishes the port 8123 to the raspberry pi port 8123.
Solution
version: '3'
services:
  homeassistant:
    image: "homeassistant/home-assistant:stable"
    volumes:
      - ~/data/homeassistant:/config
      - /etc/localtime:/etc/localtime:ro
    restart: unless-stopped
    ports:
      - 8123:8123
Now you can open http://raspberrypi.local:8123 and Home Assistant should be visible.
Configure your Home Assistant
Now just follow the set-up guide on http://raspberrypi.local:8123 to set up your home assistant.
If you’re done with it also try to stop and start the container again. You can see that Home Assistant is still configured as you left it.
This is because of the volume mapping ~/data/homeassistant:/config.
Presence detection
Now finally we can start configuring the presence detection.
FritzBox User
First of all we need a separate FritzBox account for home assistant to access the FritzBox.
Create a new account in the admin UI on http://fritz.box.
This user needs FritzBox settings and Smart Home as permissions.
Integrations
Now login at you Home Assistant, go to Settings > Devices and Services > Add integration.
We now want to add two integrations:
- AVM FRITZ!SmartHome
- AVM FRITZ!Box Tools
Start with AVM FRITZ!SmartHome.
- Fill in the just created username and password.
Continue with AVM FRITZ!Box Tools.
- Fill in the just created username and password.
- Set Host to
fritz.box.
Persons
Now we will create persons in Home Assistant for each person who should trigger the presence detection.
Go to Settings > Persons and add them. For tracking device choose their phone or device which should trigger the presence detection.
Groups
If you have multiple persons who using on room, it can make things easier to create a group for those.
See Home Assistant - Old Style Groups as a reference for how to add “old-style” groups. We need old style groups because the old groups don’t yet support groups of persons.
Task
Add a group for all members of a household which use one particular room.
Remember that all Home Assistant configuration is accessible in data/homeassistant.
Inside the container Home Assistant is running as root.
So all files in data/homeassistant are only accessible with sudo.
Solution
Do this by editing data/homeassistant/configuration.yaml.
sudo nano data/homeassistant/configuration.yaml
Add the following section (don’t replace the rest) and set name for the group and persons in the group like you want it.
group:
  living_room_user:
    name: "Living Room Users"
    entities:
      - person.simon
      - person.linus
To load those changes go to Developer Options in Home Assistant and click on “Check configuration” and if everything looks good, press restart.
Got to the History tab and select your group as entity to validate everything works.
Automation
For each device you want presence detection you need two automations:
- Coming home
- Leaving home
Go to Settings > Automations > Create a automation
Task
Create those two automations.
For trigger select a state trigger and find out what should be in the “to state” field.
For extra information consolidate the documentation (https://www.home-assistant.io/docs/automation/trigger/#state-trigger)
and look at Developer Tools > States to analyze your person / groups states.
Solution
Trigger
- a state trigger
- entity: the group or person this should depend on
- “to state”:
homefor the automations for coming home andnot_homerespectively.
Action
- device action
- device: the smart home device you want to control
Normally heating devices from AVM are controlled via heating schedules. This means that each time the heating schedule has an entry to go back to heating your change via the automation is reverted.
There is a solution for this problem using FritzBox Templates. FritzBox supports a way to change a whole heating schedule to a different one using Templates. This feature is also supported since the latest version of Home Assistant (I implemented it).
Task
Solve this problem using FritzBox Templates.
Find those in the FritzBox SmartHome menu and think of a plan how to use those in the automations instead.
Solution
Go to Smart Home > Groups and Templates in the FritzBox UI. Click on “Create a template”.
We now need again two templates for each device / group.
- coming home
- leaving home
The coming home template has the normal heating schedule of the device. This can be archived easily by selection “Save current settings as template”.
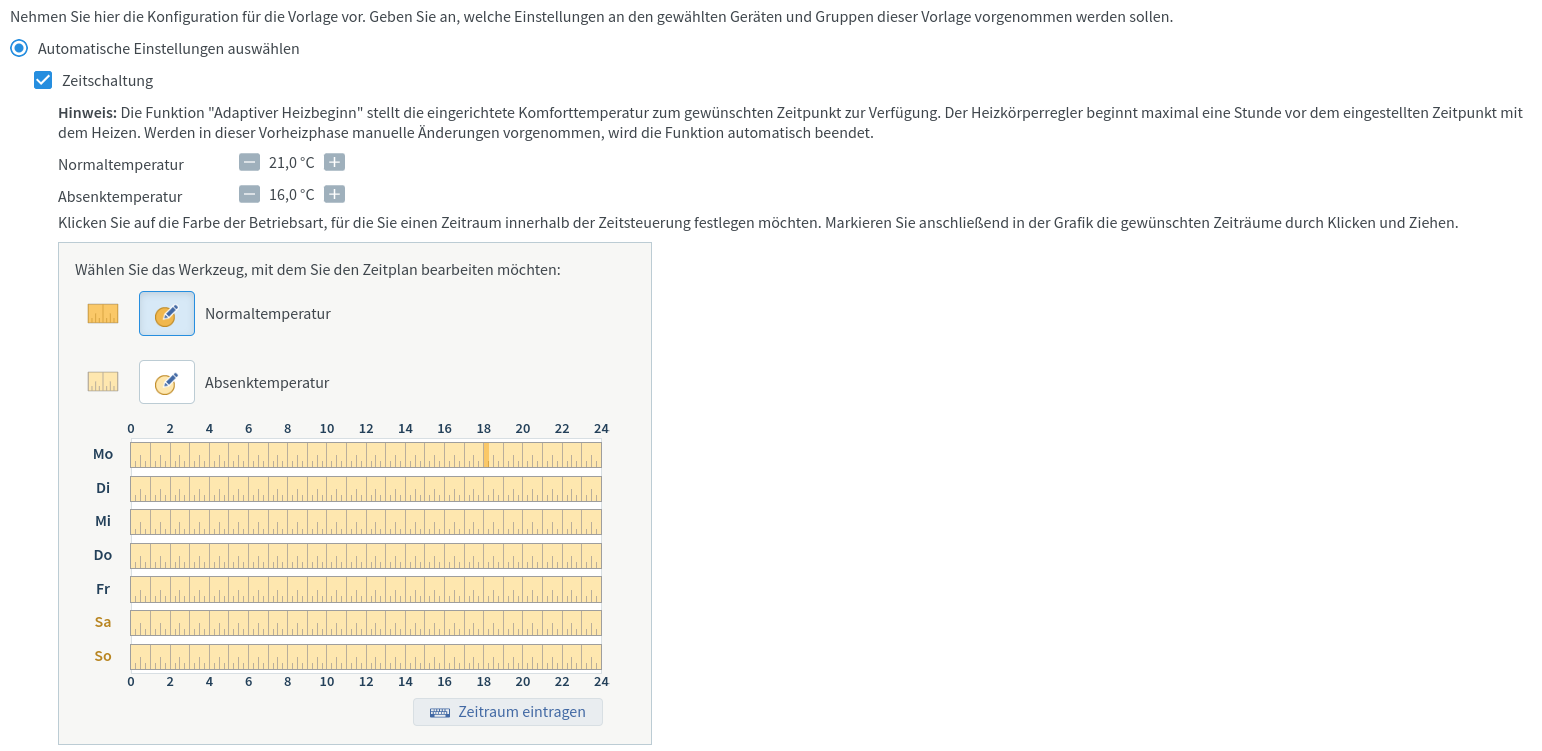
The leaving home template should be ideally only consist of an eco-temperature heating schedule.
Select create a new template and choose heating and your device.
Select Select automatic settings and time controlled heating.
This heating schedule consist by default only of eco-temperature heating.
The only problem is that if you apply this schedule somehow the current temperature is not changes because there are now changes in the schedule.
There is a work-around for this problem, by creating a tiny comfort-temperature heating zone. In the end this should look somehow like this:
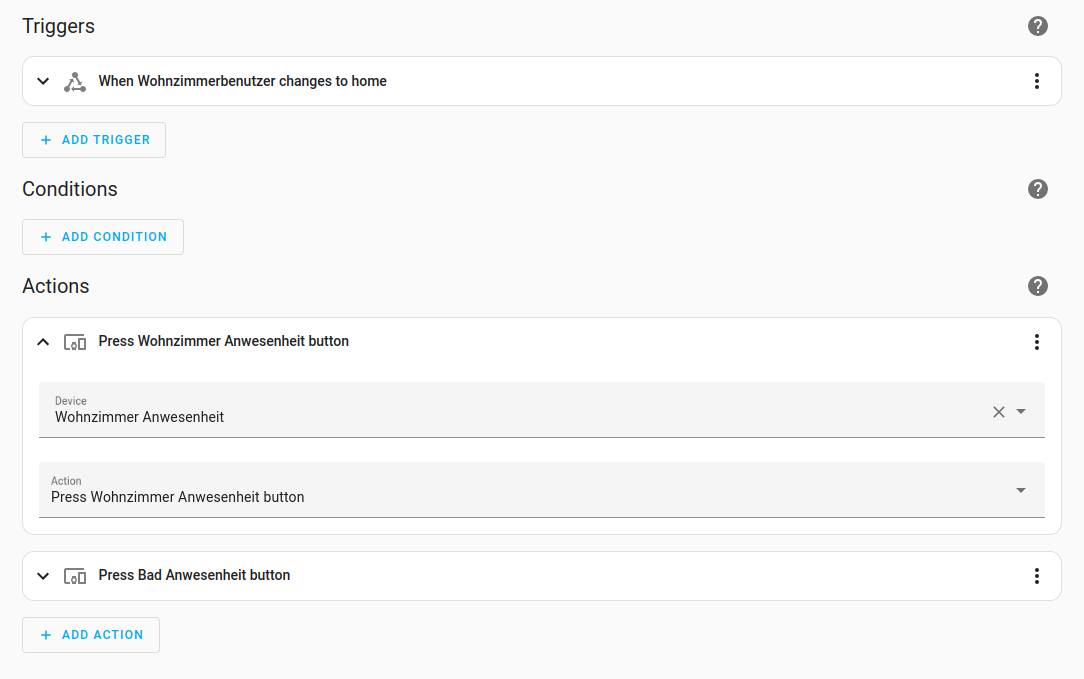
The templates should automatically be synced to Home Assistant and should appear as buttons. Go to your automations and modify the device action to press the template button respectively.
Your final automation should look somehow like this:
Now you have a working presence detection for your heating devices. Maybe watch this whole system using the History tab or the Log tab in Home Assistant. You can also try to trigger the automations using the states tab in the developer settings or by taking the devices of the network.